Spring Security OAuth 2.0 Opaque Token Authentication
How to implement an OpaqueTokenIntrospector and use method security

Backend Engineer, AWS Certified DevOps Engineer, Kafka CCDAK
How Spring Security Authentication Works
In the figure below, you can see the big picture of the main actors in the Spring Security Architecture and the relationships between them.
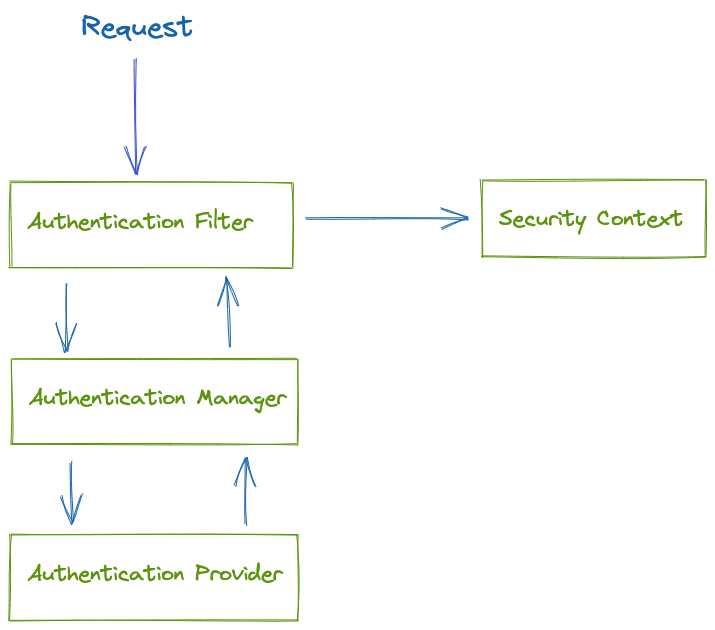
- First, the request is intercepted by the the authentication filter.
- The authentication filter delegates the authentication request to the authentication manager.
- The authentication manager uses the authentication provider to process authentication.
- The authentication provider implements the authentication logic.
- Based on the response, the authentication filter configures the Security Context.
- The Security Context keeps the authentication data.
How Opaque Token Authentication Works
Now, let’s see the architectural components that Spring Security uses to support opaque token authentication.
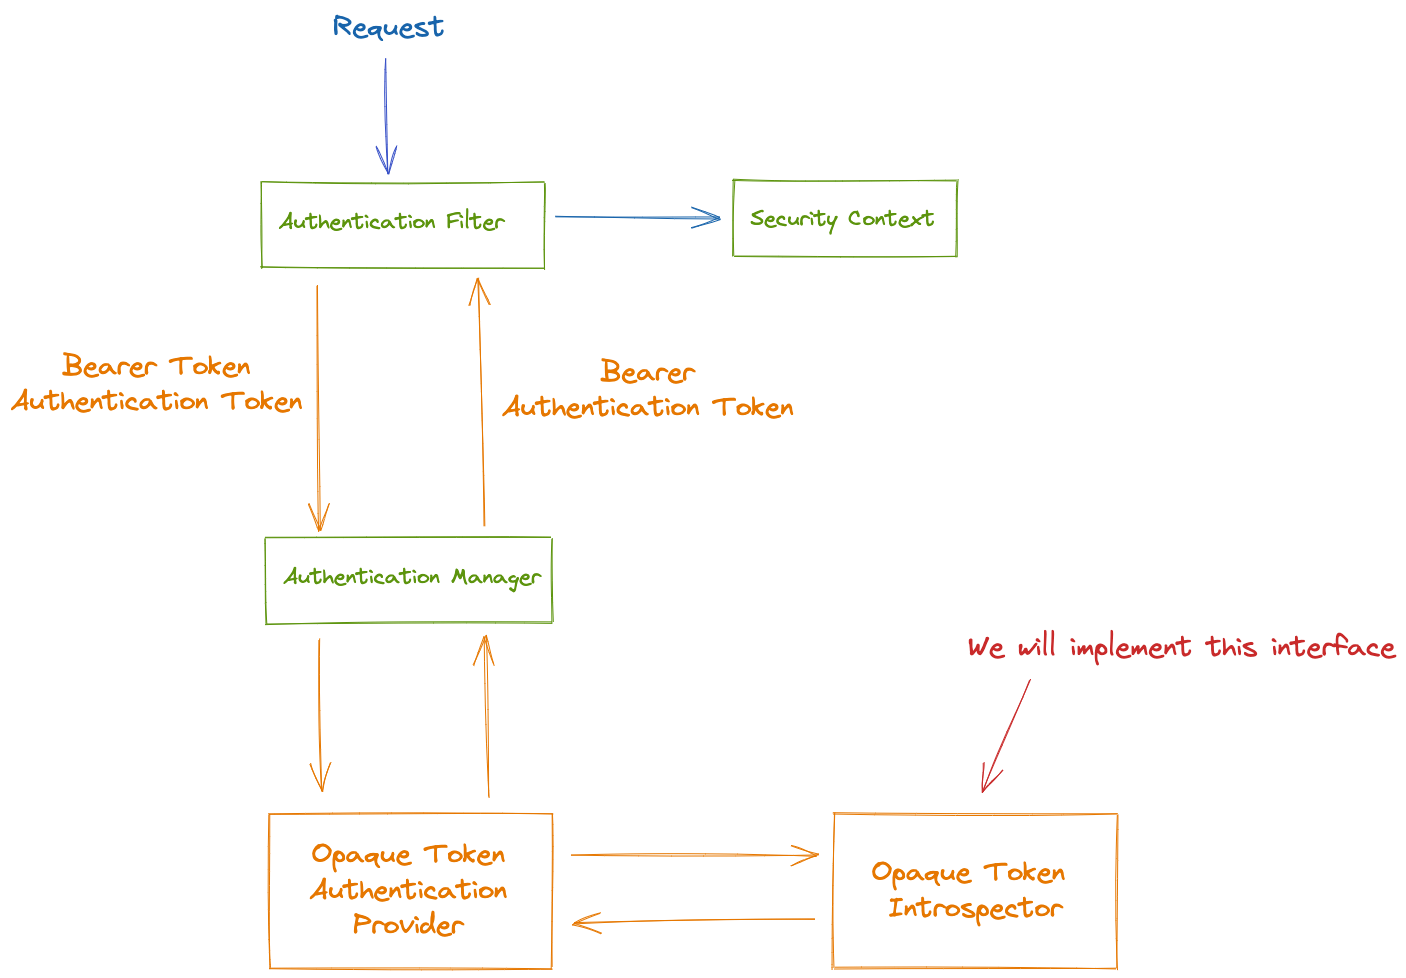
- The authentication filter passes a BearerTokenAuthenticationToken to the authentication manager.
- OpaqueTokenAuthenticationProvider is an AuthenticationProvider implementation that uses a OpaqueTokenIntrospector to authenticate an opaque token.
- OpaqueTokenAuthenticationProvider introspects the opaque token and adds granted authorities using an OpaqueTokenIntrospector.
- When authentication is successful, the Authentication that is returned is of type BearerTokenAuthentication. This authentication will be set on the SecurityContextHolder by the authentication filter.
Now let's code! We need two servers, an authorization server and a resource server.
Authorization Server
For the authorization server, we will use a simple server that has only two users:
- Username: admin; Password: admin (admin role)
- Username: alain; Password: 123(normal user role)
I've already pushed a docker image to Docker Hub that you can use. To run the authorization server, first you should have Docker, then you should run this command:
Probably this Docker Image won't work on Mac with Apple chip
docker run -p 8090:8090 alainkhoury/spring_security_auth_server
Generate Access Token
The next cURL command shows you the request you need to do to obtain an access token using the password grant type.
curl -u client:secret --request POST "http://localhost:8090/oauth/token?grant_type=password&username=admin&password=admin&scope=scope1"
You should get a response like this one
{
    "access_token": "CaRYxFhQcG6swP9L7DCI4t3Taek",
    "token_type": "bearer",
    "refresh_token": "7sxtEpkThTJ0NxSdgUYSTOBtnjQ",
    "expires_in": 43199,
    "scope": "scope1"
}
Now to check if the token is valid or not, you need to do this request
curl --request POST "http://localhost:8090/oauth/check_token?token=RD1-1ndg01i65myR1YPizMIQZoo"
If the token is valid, you will get a response like this one
{
    "active": true,
    "exp": 1645162400,
    "user_name": "admin",
    "authorities": [
        "ROLE_ADMIN"
    ],
    "client_id": "client",
    "scope": [
        "scope1"
    ]
}
At this point, we can focus on the resource server.
Resource Server
Create New Project
Go to Spring Initializr, then create a new project with this setup
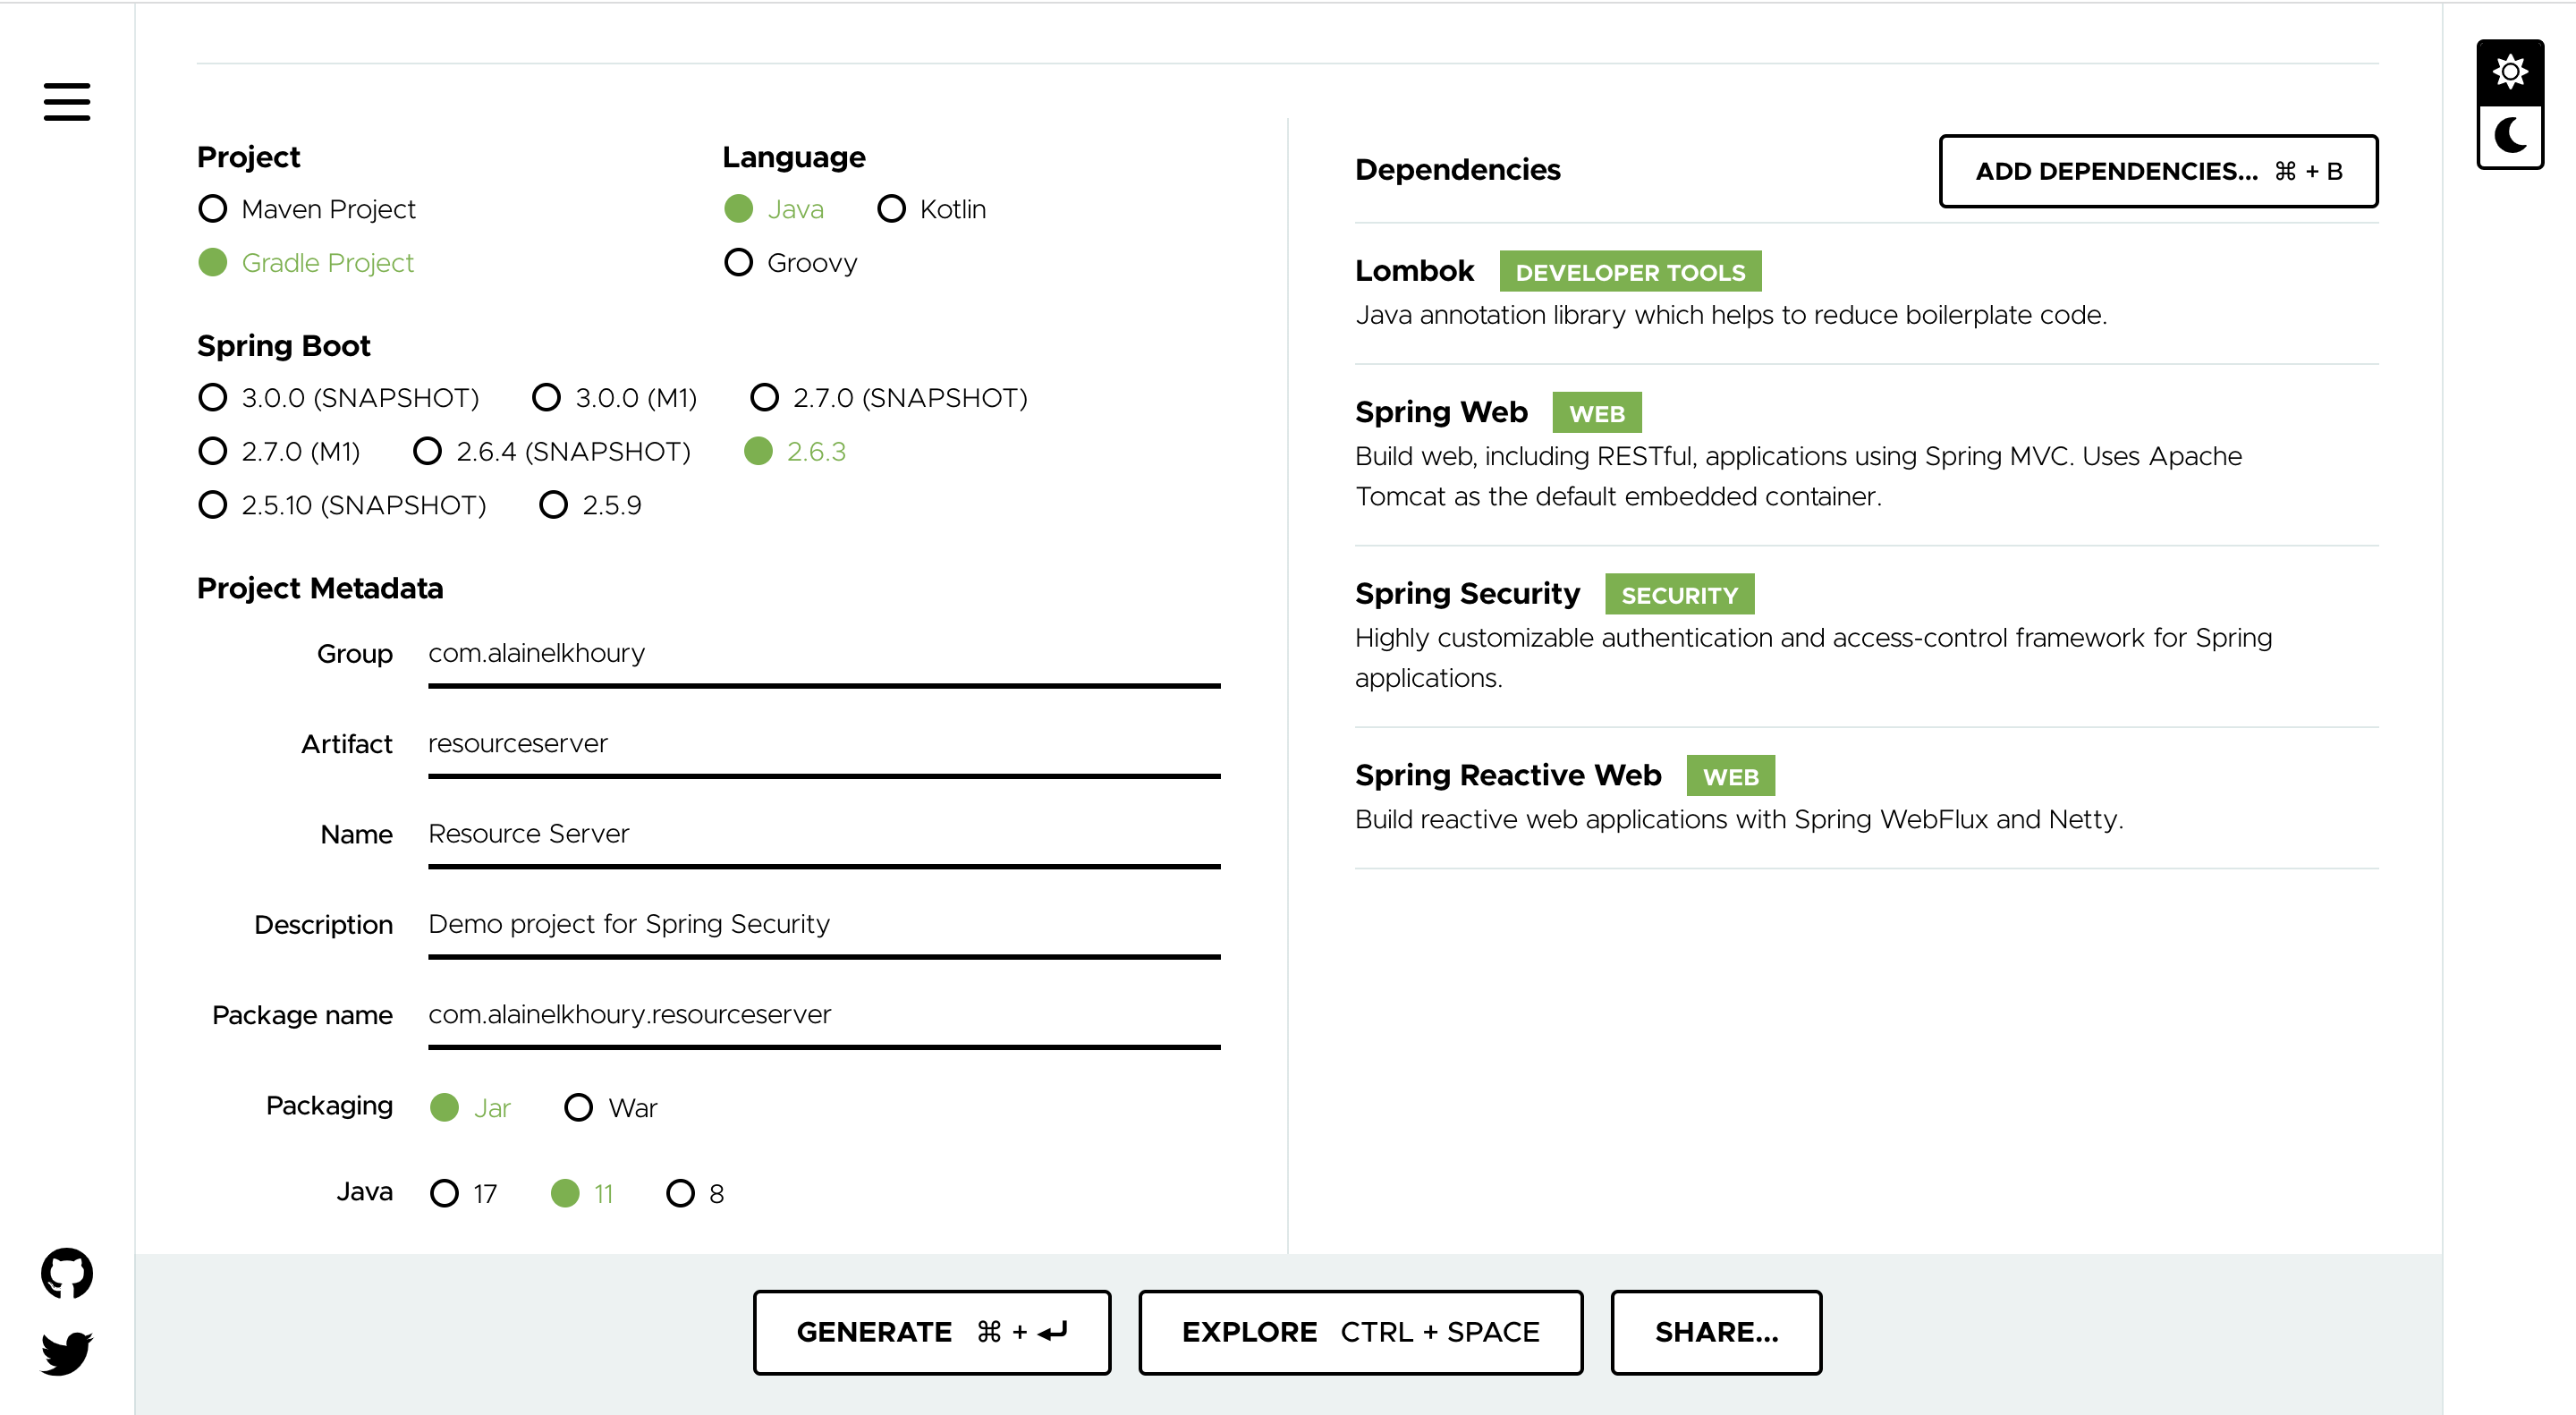
For now, we need these dependencies: Spring Web, Spring Security, Spring Reactive Web and Lombok (optional)
REST Controllers
Now create a Rest Controller "HelloController" inside "controllers" package. This controller has only one endpoint that returns "Hello World!"
package com.alainelkhoury.resourceserver.controllers;

import org.springframework.http.ResponseEntity;
import org.springframework.web.bind.annotation.GetMapping;
import org.springframework.web.bind.annotation.RestController;

@RestController
public class HelloController {

    @GetMapping("/hello")
    public ResponseEntity<String> helloWorld() {
        return ResponseEntity.ok("Hello World!");
    }

}
Now if you try to call this endpoint, you should get 401 error code.

Web Security Config
Spring Security by default creates an InMemory User with username "user" and the default password is printed in the console. However, we don't want this configuration.
In order to override it we need to create a class that extends WebSecurityConfigurerAdapterclass and then override one function. Also make sure that you add @EnableWebSecurity annotation.
Create WebSecurityConfig Java class inside config package. This class should extend WebSecurityConfigurerAdapter class and override this function:
void configure(HttpSecurity http)
To configure Spring Security to use an Opaque Token Introspector for all endpoints, you should configure it in the following way.
package com.alainelkhoury.resourceserver.config;

import org.springframework.security.config.annotation.web.builders.HttpSecurity;
import org.springframework.security.config.annotation.web.configuration.EnableWebSecurity;
import org.springframework.security.config.annotation.web.configuration.WebSecurityConfigurerAdapter;
import org.springframework.security.config.annotation.web.configurers.oauth2.server.resource.OAuth2ResourceServerConfigurer;

@EnableWebSecurity
public class WebSecurityConfig extends WebSecurityConfigurerAdapter {

    @Override
    protected void configure(HttpSecurity http) throws Exception {
        http
                .authorizeRequests()
                .anyRequest()
                .authenticated()
                .and()
                .oauth2ResourceServer(OAuth2ResourceServerConfigurer::opaqueToken);
    }
}
Now if you try to run the application, you will get an error because Spring Boot will not find a Bean of type OpaqueTokenIntrospector in the Context.
So to fix the issue, we should create a class that implements the OpaqueTokenIntrospector interface.
Opaque Token Introspector Implementation
First, you need to add oauth2 resource server dependency to your project.
Gradle:
implementation 'org.springframework.boot:spring-boot-starter-oauth2-resource-server'
Maven:
<dependency>
    <groupId>org.springframework.boot</groupId>
    <artifactId>spring-boot-starter-oauth2-resource-server</artifactId>
</dependency>
Now you need to create CustomOpaqueTokenIntrospector Java class inside introspectors package.
This class should implement OpaqueTokenIntrospector interface. Also, this class should be a Bean in the Spring Boot context, for that reason we can add @Service annotation.
package com.alainelkhoury.resourceserver.introspectors;

import org.springframework.security.oauth2.core.OAuth2AuthenticatedPrincipal;
import org.springframework.security.oauth2.server.resource.introspection.OpaqueTokenIntrospector;
import org.springframework.stereotype.Service;

@Service
public class CustomOpaqueTokenIntrospector implements OpaqueTokenIntrospector {

    @Override
    public OAuth2AuthenticatedPrincipal introspect(String token) {
        return null;
    }
}
We will implement this function in a bit, but first let's create our data transfer objects.
Data Transfer Objects
We only need a UserInfoDTO.
package com.alainelkhoury.resourceserver.dto;

import com.fasterxml.jackson.annotation.JsonProperty;
import lombok.Getter;

import java.util.List;

@Getter
public class UserInfoDTO {
    private final Boolean active;
    private final Integer exp;
    private final String username;
    private final List<String> authorities;
    private final String clientId;
    private final List<String> scope;

    public UserInfoDTO(@JsonProperty(value = "active") Boolean active,
                       @JsonProperty(value = "exp") Integer exp,
                       @JsonProperty(value = "user_name") String username,
                       @JsonProperty(value = "authorities") List<String> authorities,
                       @JsonProperty(value = "client_id") String clientId,
                       @JsonProperty(value = "scope") List<String> scope) {
        this.active = active;
        this.exp = exp;
        this.username = username;
        this.authorities = authorities;
        this.clientId = clientId;
        this.scope = scope;
    }
}
Now let's create a service that we will use to call the authorization server endpoint.
Authentication Service
In my opinion, It would be better to separate the authentication logic from the Opaque Token Introspector, with this implementation it's easier to unit test the introspector or even change/refactor the authentication logic.
Authentication Service Interface
Create an interface for the authentication service
package com.alainelkhoury.resourceserver.services;

import com.alainelkhoury.resourceserver.dto.UserInfoDTO;

public interface AuthenticationService {
    UserInfoDTO introspect(String token);
}
This interface has only one method that takes a token and returns a UserInfoDTO object.
Authentication Service Implementation
Reminder: To check if a token is valid or not, we should perform this POST request to the authorization server.
curl --request POST "http://localhost:8090/oauth/check_token?token=<access_token>'"
Add the following properties to the application.yml file
auth:
  introspection-uri: "http://localhost:8090"
The following snippet is the implementation of the authentication service which we will use in our Opaque Token Introspector.
This function will only call the authorization server and if the token was valid it will convert the response to UserInfoDTO instance, otherwise it will throw an OAuth2IntrospectionException.
package com.alainelkhoury.resourceserver.services;

import com.alainelkhoury.resourceserver.dto.UserInfoDTO;
import com.fasterxml.jackson.core.JsonProcessingException;
import com.fasterxml.jackson.databind.ObjectMapper;
import lombok.extern.slf4j.Slf4j;
import org.springframework.beans.factory.annotation.Value;
import org.springframework.http.HttpStatus;
import org.springframework.security.oauth2.server.resource.introspection.OAuth2IntrospectionException;
import org.springframework.stereotype.Service;
import org.springframework.web.reactive.function.client.WebClient;

@Service
public class LocalAuthenticationService implements AuthenticationService {

    private final String introspectionUri;

    public LocalAuthenticationService(@Value("${auth.introspection-uri}") String introspectionUri) {
        this.introspectionUri = introspectionUri;
    }

    @Override
    public UserInfoDTO introspect(String token) {

        final String PATH = "/oauth/check_token";

        String rawResponse = WebClient.create(this.introspectionUri)
                .post()
                .uri(uriBuilder -> uriBuilder
                        .path(PATH)
                        .queryParam("token", token)
                        .build())
                .retrieve()
                .onStatus(HttpStatus::is4xxClientError, response -> {
                    throw new OAuth2IntrospectionException("Unauthorized");
                })
                .onStatus(HttpStatus::is5xxServerError, response -> {
                    throw new OAuth2IntrospectionException("Unauthorized");
                })
                .bodyToMono(String.class)
                .block();

        ObjectMapper objectMapper = new ObjectMapper();
        try {
            UserInfoDTO userInfoDTO = objectMapper.readValue(rawResponse, UserInfoDTO.class);
            return userInfoDTO;
        } catch (JsonProcessingException e) {
            throw new OAuth2IntrospectionException("Unauthorized");
        }
    }
}
Now let's get back to our CustomOpaqueTokenIntrospector.
CustomOpaqueTokenIntrospector
First, we should inject an implementation of type AuthenticationService as a dependency for CustomOpaqueTokenIntrospector.
private final AuthenticationService authenticationService;

@Autowired
public CustomOpaqueTokenIntrospector(AuthenticationService authenticationService) {
    this.authenticationService = authenticationService;
}
Now let's implement the introspect function.
@Override
public OAuth2AuthenticatedPrincipal introspect(String token) {
    UserInfoDTO userInfoDTO = authenticationService.introspect(token);

    Collection<GrantedAuthority> authorities = userInfoDTO
            .getAuthorities()
            .stream()
            .map(SimpleGrantedAuthority::new)
            .collect(Collectors.toList());

    Map<String, Object> attributes = new HashMap<>();
    attributes.put("USER_INFO_DTO", userInfoDTO);

    return new OAuth2IntrospectionAuthenticatedPrincipal(attributes, authorities);
}
Let's go step by step in this function.
- First, we call introspect function of the authentication service with the token. We get back a
UserInfoDTO. If the token is invalid, it will throw an exception. - The second step is to create a list of
GrantedAuthority. This list will represent the authorities for this user. We will just iterate over the authorities attribute ofUserInfoDTOand convert each String toSimpleGrantedAuthority. - Then we create an attributes Map, we can add whatever attributes we want to this Map. For simplicity I've added the whole
UserInfoDTOobject. - Finally, we return a
OAuth2IntrospectionAuthenticatedPrincipaland we pass the attributes and authorities to the constructor.
Now you can call /hello endpoint with a valid token and you should be able to access it!
How To Access The Authentication Object at Controller
Once a token is authenticated, an instance of BearerTokenAuthentication is set in the SecurityContext. That means it's available in the controller too.
@GetMapping("/foo")
public ResponseEntity foo(BearerTokenAuthentication authentication) {
    return ResponseEntity.ok(authentication.getTokenAttributes().get("USER_INFO_DTO"));
}
How To Use Roles
You can say for example that only users with admin role can call /foo endpoint. To do this, simply add this change to WebSecurityConfig.
@Override
protected void configure(HttpSecurity http) throws Exception {
    http
            .authorizeRequests(request -> {
                request.mvcMatchers("/foo").hasRole("ADMIN")
                        .anyRequest()
                        .authenticated();
            })
            .oauth2ResourceServer(OAuth2ResourceServerConfigurer::opaqueToken);
}
Also, you can add security to methods. For example, create a HelloService and add @PreAuthorize("hasRole('ADMIN')") annotation above the method that you want only users with ADMIN role to call it.
package com.alainelkhoury.resourceserver.services;

import org.springframework.security.access.prepost.PreAuthorize;
import org.springframework.stereotype.Service;

@Service
public class HelloService {

    @PreAuthorize("hasRole('ADMIN')")
    public String sayHello() {
        return "Hello!";
    }
}
Modify the "/hello" endpoint to call this function.
@RestController
@RequestMapping
public class HelloController {

    @Autowired
    private HelloService helloService;

    @GetMapping("/hello")
    public ResponseEntity<String> helloWorld(BearerTokenAuthentication authentication) {
        return ResponseEntity.ok(helloService.sayHello());
    }
}
Important: To enable method security, you should add this annotation to the WebSecurityConfig class.
@EnableGlobalMethodSecurity(prePostEnabled = true)
Now if you try to call /hellowith a token from the normal user, you will get a 403 error code. However, if you try to call it with an admin token, you will get a response back!
Thank you for reading!
GitHub Repo URL: https://github.com/alainkhouryy/spring_security_oauth2

